Sunday, December 6, 2020

open specific view from many2one field

 ODOO 


In this case we have many2one field for model that has more than one view and we want to open specific view from this field for this model

let us give an example :

- we have model "object.a" and model "object.b", in which we have object_a_id field as bellow 

object_a_id = fields.Many2one('object.a', string="Object A")


- model "object.a" has two form view with ids "object_a_form_view_1" and "object_a_form_view_2" and "object_a_form_view_1" id the default view and we want to show the other view from object_a_id field , so we can do it by add the field in the xml file as bellow


<field name="object_a_id" context="{'form_view_ref':'module_name.object_a_form_view_2',}" />

Thursday, December 3, 2020

OperationalError: FATAL: the database system is starting up

ODOO


The error above happen when the postgres database service can not start , so to fix it we have to restart the postgres by opening the terminal and write the command bellow 

sudo service postgresql restart

Tuesday, December 1, 2020

The tag is deprecated, use a tag for

 ODOO 

odoo 14


"The <report> tag is deprecated, use a <record> tag for ...etc "

some time you can get the error above when you create new report tin odoo 14.0 because 90% created it as bellow ,

<report
            id="report_action_id"
            string="Report Name"
            model="model.name"
            report_type="qweb-html"
            name="module_name.report_temp_id"
            menu="True"
        />


But , You have to create it as bellow to fix this error 


<record id="report_action_id" model="ir.actions.report">
        <field name="name">Report Name</field>
        <field name="model">model.name</field>
        <field name="report_type">qweb-pdf</field>
        <field name="report_name">module_name.report_temp_id</field>
        <field name="report_file">module_name.report_temp_id</field>
        <field name="binding_model_id" ref="model.name"/>
        <field name="binding_type">report</field>

</record>

Friday, November 27, 2020

many2one field domain from function

 ODOO

 odoo 14


in this blog we will explain how we can define domain for Many2one field in odoo 14 , so let us start 


First we have "object.a" model which is contain Many2many in which we will add many users , as bellow

user_ids = fields.Many2many('res.users', string="Users")

Second we have "object.b" model , which we have user_id field that contain the current user , and object_a_id which is Many2one field from object "A" , as bellow

user_id = fields.Many2one('res.users', string='Created By', default=lambda self: self.env.user, readonly=True)

object_a_id = fields.Many2one('object.a', string="A")

and we need to make domain over object_a_id field to show only the records from object A that the current user is involved in the user_ids field 

....

To make the domain we have to add function as bellow  

    @api.onchange('some_field_in_B_object')
    def _get_object_b_ids(self):
        """
        function to get the A records for the current user
        """
        object_a_ids = self.env['object.a'].search([])
        ids_lis = []
        domain = [('id','=', -1)]

        for rec in object_a_ids:
            for line in rec.user_ids:
                if self.user_id == line:
                    ids_lis.append(rec.id)
        res = {}
        res['domain'] = {'object_a_id': [('id', 'in', ids_lis)]}
        return res


Wednesday, November 11, 2020

create new branch on github

GitHub


In the blog we will explain how we can create new branch on github from terminal , so follow the steps bellow 


1/ create new folder with name local_branch 

2/ open the terminal with it's path and write the comands bellow one by one


git init // to initialize local repo 

git add . // to add all folders in this folder to your local repo

git checkout -b local_branch // to make checkout 

git commit -m "any text message you want" // to commit your changes

git remote add origin remote_repo_path on github // to add your local branch to remote branch 

git push origin local_branch //  to push your files to the remote branch

Monday, November 2, 2020

random function in odoo 14

in this blog we will explain example to generate random number of 4 digits in odoo so let us start 


- First we have to import choice class from random package as bellow

from random import choice

- Then we have to import digits class from string package as bellow 

from string import digits

- Last we can use the function bellow that will return the random number

def _default_random_pin(self):
        return ("".join(choice(digits) for i in range(4)))


Wednesday, October 21, 2020

How to use many2one field in demo data

Odoo

Demo Data


 In this blog we will explain how to add value for many2one field in the xml demo data file in odoo , so let us start 

First let us say we have python object by the name 'report.create' which is contain the model_id field which is many2one field from 'ir.model' as bellow 

class ReportCreater(models.Model):
    _name = 'report.creater'

    model_id = fields.Many2one(
        'ir.model', string='Model', required=True, ondelete="cascade",
        help="The type of document this template can be used with")

and we want to create demo data for this object and the records from the demo data must contain the model_id field , so we can do it as bellow 

<odoo>
  <data noupdate="0">
    <record id="simple_contract_template" model="desined.report.template">
      <field model="ir.model" name="model_id" search="[('model', '=', 'res.partner')]"/>
    </record>
  </data>
</odoo>


*NOTES

  • 'ir.model' this object contain all models in the data base
  • search="[('model', '=', 'res.partner')] in this step we made search in the 'ir.model' object to return record from it , and in that record the value of model field must be 'res.partner'
  • 'ir.model' contain the model field which is char field

Monday, October 19, 2020

defined as ondelete='restrict'

I face the error bellow we I tried to install some module in odoo 14 , the error is 

ValueError: Field mark_id of model rep.template is defined as ondelete='restrict 


of course ! , I have model by name 'rep.template', in which that I have many2one file defined as bellow 

mark_id = file.Many2one('rep.mark', string='Mark')

and I face the error above because of this field , so to fix this error I rewrite this field as bellow

mark_id = file.Many2one('rep.mark', string='Mark', ondelete="cascade")


github from terminal

GitHub


 On this topic we will explain how to deal with github from terminal 

First : if you don't have account on github , you can create it from here , then follow me :)


Login to git hub from terminal by the command 

git config --global user.email "your_email_address@example.com" 


Initialized empty git repository 

git init


Remove the initialized empty repository 

rm -rf .git


Show repository activity log

git log


Clone files from the repository in the current folder 

git clone repo_url . // the . means that we want to clone files in the current directory


View the information about the repository 

git remote -v 


List all branches in the repository 

git branch -a


Show the changes that we had made to the code 

git diff


Add all working files to the staging

git add -A


Commit the add files in the local device 

git commit - m "Some Message :)"


Push the committed changes locally to the remote repository at git.com (2 steps < pull and push >)

git pull origin branch_name // to check if any other developer make any changes in the repository (origin is the name of the remote repository)

git push origin branch_name // to push our changes to the repository (branch)


Create new branch 

 git branch branch_name  // this will create new branch in the current repository 


Switch the current working with branch 

git checkout branch_name 


Push changes to specific specific branch in the remote repository

git push -u origin branch_name // #not : we can to pull by this way too


Merge a  branch with the current branch 

git branch --merged

git merge branch_name


Delete Branch

git branch -d branch_name // this will delete the branch from the local 

git push origin --delete branch_name // this will push the deleted branches to the remote repository 


Note :

you can download the ref form here


Sunday, October 18, 2020

nginx with odoo 14

Odoo

Nginx 


I this topic we will explain how to configure nginx for localhost odoo server by steps, but before that you need to install nginx and running odoo server and then follow the steps 

First : go to /etc/nginx/enable-sites and add new configuration file by the name odoo14.localhost which will configure your nginx for odoo local server

Second : open the file /etc/hosts and add the localhost (127.0.0.1) to the file as bellow 

Third : add the ssl certification by going to etc/ssl and create new folder by name nginx and inside it run the command bellow 

openssl req -x509 -new -newkey rsa:2048 -nodes -keyout odoo.key -days 9999 -out odoo.crt

###


odoo14.localhost file will be as

#odoo server
  upstream odoo {
   server 127.0.0.1:8069;
  }
  upstream odoochat {
   server 127.0.0.1:8072;
  }
  # http -> https
  server {
     listen 80;
     #server_name odoo.mycompany.com;
     rewrite ^(.*) https://$host$1 permanent;
    }
  server {
   listen 443;
   #server_name odoo.mycompany.com;
   proxy_read_timeout 720s;
   proxy_connect_timeout 720s;
   proxy_send_timeout 720s;
   # Add Headers for odoo proxy mode
   proxy_set_header X-Forwarded-Host $host;
   proxy_set_header X-Forwarded-For $proxy_add_x_forwarded_for;
   proxy_set_header X-Forwarded-Proto $scheme;
   proxy_set_header X-Real-IP $remote_addr;
# SSL parameters
   ssl on;
   ssl_certificate /etc/ssl/nginx/odoo.crt;
   ssl_certificate_key /etc/ssl/nginx/odoo.key;
   ssl_session_timeout 30m;
   ssl_protocols TLSv1 TLSv1.1 TLSv1.2;
   ssl_ciphers 'ECDHE-RSA-AES128-GCM-SHA256:ECDHE-ECDSA-AES128-GCM-SHA256:ECDHE-RSA-AES256-GCM-SHA384:ECDHE-ECDSA-AES256-GCM-SHA384:DHE-RSA-AES128-GCM-SHA256:DHE-DSS-AES128-GCM-SHA256:kEDH+AESGCM:ECDHE-RSA-AES128-SHA256:ECDHE-ECDSA-AES128-SHA256:ECDHE-RSA-AES128-SHA:ECDHE-ECDSA-AES128-SHA:ECDHE-RSA-AES256-SHA384:ECDHE-ECDSA-AES256-SHA384:ECDHE-RSA-AES256-SHA:ECDHE-ECDSA-AES256-SHA:DHE-RSA-AES128-SHA256:DHE-RSA-AES128-SHA:DHE-DSS-AES128-SHA256:DHE-RSA-AES256-SHA256:DHE-DSS-AES256-SHA:DHE-RSA-AES256-SHA:AES128-GCM-SHA256:AES256-GCM-SHA384:AES128-SHA256:AES256-SHA256:AES128-SHA:AES256-SHA:AES:CAMELLIA:DES-CBC3-SHA:!aNULL:!eNULL:!EXPORT:!DES:!RC4:!MD5:!PSK:!aECDH:!EDH-DSS-DES-CBC3-SHA:!EDH-RSA-DES-CBC3-SHA:!KRB5-DES-CBC3-SHA';
   ssl_prefer_server_ciphers on;
  # log
   access_log /var/log/nginx/odoo.access.log;
   error_log /var/log/nginx/odoo.error.log;
   # Redirect longpoll requests to odoo longpolling port
   location /longpolling {
   proxy_pass http://odoochat;
   }
   # Redirect requests to odoo backend server
   location / {
     proxy_redirect off;
     proxy_pass http://127.0.0.1:8069;
   # common gzip
   gzip_types text/css text/less text/plain text/xml application/xml application/json application/javascript ;
}
}


The hosts file will be as

127.0.0.1    localhost
127.0.1.1    ahmed-HP-EliteBook-8460p
172.0.0.1       localhost.odoo

# The following lines are desirable for IPv6 capable hosts
::1     ip6-localhost ip6-loopback
fe00::0 ip6-localnet
ff00::0 ip6-mcastprefix
ff02::1 ip6-allnodes
ff02::2 ip6-allrouters


The odoo configuration file will be as 

[options]
; This is the password that allows database operations:
admin_passwd = Ahmmar
db_host = False
db_port = 5432
db_name = False
db_user = ahmed
xmlrpc_port = 8069
longpolling_port = 8072
db_password = False
addons_path = /home/ahmed/Desktop/Odoo_14/addons, /home/ahmed/Desktop/Odoo_14/addons/custom_addons
proxy_mode = True
dbfilter = ^%h$
logfile = /var/log/odoo14/odoo14-service.log


###

Here are some important commands

nginx -t >> to test if the nginx conf files are okay

systemctl restart nginx.service >> to restart nginx 

sudo su -- >> to login as root user


*NOTE

after doing the above configuration you have to restart the odoo server and go to your browser and open https://localhost which will open the creation page for new database

Tuesday, October 13, 2020

Integurate Odoo with Nginx

Nginx


We use nginx with odoo as reverse proxy act as an intermediary between the clients and the Odoo server , and in this topic we will explain how to use nginx , ssl and reverse proxy to odoo 

Now as we know , odoo is web base and that means we can access the odoo server from the internet if it has  public ip address , so why we use Nginx as reverse proxy ?

Answer : because of

Reverse proxy benefits

  • Load Balancing
  • SSL Termination
  • Caching
  • Compression
  • Serving Static Content


Before configure nginx to be reverse proxy to odoo you have to check the following points 

  • you have domain pointing to your odoo server 
  • you have installed nginx on your computer 
  • you have ssl certification installed for your domain 
 

so to configure your odoo server with nginx follow the steps bellow 


  • Edit nginx configuration file

    open the file bellow and change odoo.example.com to your domain
    /etc/nginx/sites-enabled/odoo.example.com
     
upstream odoo {
 server 127.0.0.1:8069;
}

upstream odoo-chat {
 server 127.0.0.1:8072;
}

server {
    server_name odoo.example.com;
    return 301 https://odoo.example.com$request_uri;
}

server {
   listen 443 ssl http2;
   server_name odoo.example.com;

   ssl_certificate /path/to/signed_cert_plus_intermediates;
   ssl_certificate_key /path/to/private_key;
   ssl_session_timeout 1d;
   ssl_session_cache shared:SSL:50m;
   ssl_session_tickets off;

   ssl_dhparam /path/to/dhparam.pem;

   ssl_protocols TLSv1 TLSv1.1 TLSv1.2;
   ssl_ciphers 'ECDHE-ECDSA-CHACHA20-POLY1305:ECDHE-RSA-CHACHA20-POLY1305:ECDHE-ECDSA-
AES128-GCM-SHA256:ECDHE-RSA-AES128-GCM-SHA256:ECDHE-ECDSA-AES256-GCM-SHA384:ECDHE-RSA-
AES256-GCM-SHA384:DHE-RSA-AES128-GCM-SHA256:DHE-RSA-AES256-GCM-SHA384:ECDHE-ECDSA-
AES128-SHA256:ECDHE-RSA-AES128-SHA256:ECDHE-ECDSA-AES128-SHA:ECDHE-RSA-AES256-SHA384:
ECDHE-RSA-AES128-SHA:ECDHE-ECDSA-AES256-SHA384:ECDHE-ECDSA-AES256-SHA:ECDHE-RSA-AES256-
SHA:DHE-RSA-AES128-SHA256:DHE-RSA-AES128-SHA:DHE-RSA-AES256-SHA256:DHE-RSA-AES256-SHA:
ECDHE-ECDSA-DES-CBC3-SHA:ECDHE-RSA-DES-CBC3-SHA:EDH-RSA-DES-CBC3-SHA:AES128-GCM-SHA256:
AES256-GCM-SHA384:AES128-SHA256:AES256-SHA256:AES128-SHA:AES256-SHA:DES-CBC3-SHA:!DSS';
   ssl_prefer_server_ciphers on;

   add_header Strict-Transport-Security max-age=15768000;

   ssl_stapling on;
   ssl_stapling_verify on;
   ssl_trusted_certificate /path/to/root_CA_cert_plus_intermediates;
   resolver 8.8.8.8 8.8.4.4;

   access_log /var/log/nginx/odoo.access.log;
   error_log /var/log/nginx/odoo.error.log;

   proxy_read_timeout 720s;
   proxy_connect_timeout 720s;
   proxy_send_timeout 720s;
   proxy_set_header X-Forwarded-Host $host;
   proxy_set_header X-Forwarded-For $proxy_add_x_forwarded_for;
   proxy_set_header X-Forwarded-Proto $scheme;
   proxy_set_header X-Real-IP $remote_addr;

   location / {
     proxy_redirect off;
     proxy_pass http://odoo;
   }

   location /longpolling {
       proxy_pass http://odoo-chat;
   }

   location ~* /web/static/ {
       proxy_cache_valid 200 90m;
       proxy_buffering    on;
       expires 864000;
       proxy_pass http://odoo;
  }

  # gzip
  gzip_types text/css text/less text/plain text/xml application/xml application/json application/javascript;
  gzip on;
}

  • restart nginx server

sudo systemctl restart nginx
  •  Change the binding interface

this step is optional but it's good for security , and we make it because odoo server by default listening of port 8069 on all interfaces , and by adding this step we will disable direct access to odoo server , and we can do that by adding the lines bellow inside odoo configuration file 
xmlrpc_interface = 127.0.0.1
netrpc_interface = 127.0.0.1
 
  • Restart the odoo server

###
 
read aslo 


Nginx


Before explain Nginx we have to explain many things , now let us say we want to visit google.com so we will open our browser and type the URL www.google.com and but actually what is happening ?

when we visit any web site we actually visit a computer or a WEB SERVER , so the web server is the computer that has a public ip and domain and it can provides web pages , so any web site that we visit can be a computer (server) or more than on computer (servers) 
 
 
Web server 
    is a computer that can deliver requested web pages , and it has ip address and domain name  
 

now how to make my computer work as web server ?

To make any computer works as a web server we have to do two main things 
     _ Use web server software , which is that software make your computer act as web server , and these software can be (XAMPP , Nginx, microsoft IIS ... etc)
     _ connect your computer to the global network  


What is Nginx ?

NGINX is open source software for web serving, reverse proxying, caching, load balancing, media streaming, and more. It started out as a web server designed for maximum performance and stability. In addition to its HTTP server capabilities, NGINX can also function as a proxy server for email (IMAP, POP3, and SMTP) and a reverse proxy and load balancer for HTTP, TCP, and UDP servers. (ref)


How to install nginx on ubuntu ?

open your terminal and write down the commands bellow 

       sudo apt-get update

       sudo apt install nginx

 after install it , you can check it by open "localhost" on your browser , and if it open the page on the image above that means it installed successfully 


Create your website with nginx

Default page is placed in /var/www/html/ location. You can place your static pages here, or use virtual host and place it other location


Sunday, September 27, 2020

ASAP


what is ASAP

هو نظام إلكتروني بالكامل تستخدمه الوكالات الفدرالية لتحويل الأموال بسرعة وأمان إى المنظمات المتلقة ، حيث تقوم الوكالات الفدرالية بتسجيل المنظمات المستفيدة وتفوض مدفوعاتها وتدير حساباتها ، ثم تطلب المنظمات المستفيدة المدفوعات من هذه الحسابات المصر بها مسبقا ، وتشمل المنظمات المستفيدة ، الحكومات ، المحليات ، المؤسسات التعليمية ، المؤسسات المالية ، المؤسسات الربحية وغير الربحية


Benefits of ASAP

توفير الوقت لكل الوكالات الفدرالية والمستفيدين 
أكثر أمان في نقل الأموال
يقلل من تكلفة ومسؤولية إمتلاك أموال خارج الخزينة
يعمل دون الحاجة إلى تثبيت برنامج جديد
يتيح للوكالات والمؤسسات الحصول على تقارير بالبيانات ذات الصلة بمافي ذلك أرصدة الحسابات وتاريخ وحالة المدفوعات 
دعم العملاء المباشر لكل الوكالات والمستفيدين


Payment Options with ASAP

مدفوعات المنح : يحصل أصحاب المنح على الأموال التي تم منحها من جهات مسبقا 
خطاب مدفوعات الأمان : يحصل الوكلاء الماليون على تعويضات عن الخدمات التي يقدمونها للوكالات الفدرالية
مدفوعات بطاقات الخضم : تحصل المؤسسات المالية التي تدير برنامج بطاقات الخصم الأمريكية على أموال سمحت بها الوكالة مسبقا


How ASAP works

تقوم الوكالات الفدرالية والمستفيد كلاهما بالتسجيل 
تقوم الوكالات الفدرالية بإضافة الأموال إلى حسابات المستفيدين ، وتضع القواعد للدفعيات
يقوم المستفيدين بطلب الأموال من حساباتهم الخاصة 
يتم تسوية المدفوعات المعتمدة في نفس اليوم

show selection field on webpage

ODOO


To explain how to show selection field on your webpage as we did in the image, let us say that we have created web page or we want to show new selection field on our odoo website shop "we add new selection field to our products and we want to show it on shop page"
 
so we can show our field just as below 
 
<select class="form-control" name="category">
      <t t-foreach="product.sale_units_ids" t-as="category">
            <option t-attf-value="#{category.id}"><t t-esc="category.name"/>  </option>
      </t>
</select>

Tuesday, September 22, 2020

Cloud computing

Cloud Computing


What is the cloud computing ?

Cloud Computing : is the delivery of computing services such as "networks, software, databases and storage" over the internet in order to offer many features such as " flexibility, availability, and high performance "

What are the benefits cloud computing ?

  •  reducing costs : using the cloud computing can be lees costs than create your own software or information system or your own applications and baying the need devices to run it for many reasons 
  1. reducing the cost of the system upgrade and the hardware costs 
  2. no need to pay for your IT staff 
  3. reducing your energy costs 
  4. fewer time delays
  • business continuity : Cloud computing can provide the most guarantees of business continuity as it reduces data loss and security problems for the enterprise business information.
  • Automatic access to updates :  Through the cloud computing, updates can be installed automatically in the system, which reduces the time, effort and costs that were consumed in the process of updating
  • Collaboration efficiency : Cloud computing gives you wider and easier options to deal with the external community, customers, suppliers, and everyone you need to communicate with to complete your business
  • Flexibility : Cloud computing allows high levels of flexibility for employees to conduct business, as all that is needed for the employee to do business is to connect to the Internet, so the employee can do business from both home and office


Saturday, September 19, 2020

Type casting in java

JAVA


in this blog we will explain type casting and ASCII codes in java 

 To explain the type casting let us ask question  , if we have the code this code bellow , what the value will store in the variable num at the end of this code ?

public class test{
    public static void main(String[]args){
        int num;
        num = 7/2;
    }
}

yes , you are right num will contain 3 , but let me ask another two questions , is 7/2 really equals 3 ? and why it's contain 3 , not 3.5 ?

of course it's contain 3 because it's defined as integer variable , and if we want to store a decimal number on it , we have to convert it from integer to double or float , in another words we have to make type casting for it 

So , the Type Casting in java is The process of converting the value of one primitive data type to another data type

so now we can say that "we can change either the value of a variable or it's data type 

And the ASCII is a code for representing English characters as numbers, each letter of english alphabets is assigned a number ranging from 0 to 127


Now let us give an example to explain all of this , 

Q: write a java  program in which you define a variable that contain one English letter , then the program must check if the letter is in big case , convert it to small case , and the opposite


So the code can be just as : 

public class test{
    public static void main(String[]args){
        char letter = 'A';
        if((int)letter >= 65 && (int)letter < 97){
            letter = (char)((int)letter+32);
            System.out.println("the letter was capital converted to small "+letter);
        }
        if((int)letter <= 129 && (int)letter >= 97){
            letter = (char)((int)letter-32);
            System.out.println("the letter was small converted to capital "+letter);
        }
    }
}


and the output will be as bellow 


Java Code Examples

تعليم البرمجة

Java codes

  •  write a program in java that define a char variable and store a letter in this variable , then if the letter is capital print "Capital Letter" and if it's small print "Small Letter", and the out put must be as bellow 
أكتب برنامجًا في جافا يحدد متغير نصي ويخزن حرفًا في هذا المتغير ، فإذا كان الحرف كبير أطبع
"Capital Letter" 
وإذا كان حرفًا صغيرًا أطبع
"Small Letter" ،
ويجب أن يكون الإخراج كما يلي


and the code can be just as 

public class test{
    public static void main(String[]args){
        char st_text = 'A';
        if((int)st_text>64 && (int)st_text<97){
            System.out.println("Capital Letter");
        }
        if((int)st_text>96 && (int)st_text<123){
                    System.out.println("Small Letter");
        }
    }
}


  • write a java program in which you must define 2 integer variables with 2 values , and then switch the values with out using any other variable ,  and the out put must be as bellow 
اكتب برنامج جافا وقم بتحدد متغيرين صحيحين مع قيمتين ،
ثم قم بتبديل القيم بدون استخدام أي متغير آخر ،
ويجب أن يكون الإخراج على النحو التالي


so the code can be just as 

public class test{
    public static void main(String[]args){
        int num1 = 10,num2 = 20;
        System.out.println("____________________ Before converting _____________________");
        System.out.println();
        System.out.println();
        System.out.println("the first number is = "+num1);
        System.out.println("the second number is = "+num2);
        System.out.println();
        System.out.println();
        System.out.println("____________________ After converting _____________________");
        System.out.println();
        System.out.println();
        num1 = num1+num2;
        num2 = num1-num2;
        num1 = num1-num2;
        System.out.println("the first number is = "+num1);
        System.out.println("the second number is = "+num2);
        System.out.println();
        System.out.println();
    }
}


  • write a java program that check if a number It is divisible by 3 and 4 , and the out put must be as bellow 
اكتب برنامج جافا للتحقق مما إذا كان الرقم قابلاً للقسمة على 3 و 4 ،
ويجب أن يكون الإخراج على النحو التالي

so the code can be just as 

public class test{
    public static void main(String[]args){
        int num = 29;
        if(num%3 == 0 && num%4 == 0){
            System.out.println("Right number");
        }
        else{
            System.out.println("Wrong number");
        }
    }
}


Wednesday, September 16, 2020

Examples Java Codes

java codes

تعليم البرمجة

Example 1

Q :
 write a program in Java that calculates the ratio of upper and lower case letters in the following text 
"To be or not To be: That Is the Question"
 
so the code will be just as 

public class test{
    public static void main(String[]args){
        String var_string = "To be or not To: That Is the Questtion";
        double big_letters_per ,small_letters_per;
        int big_letters_counter = 0,small_letters_counter = 0;
        for(int index=0;index<var_string.length();index++){
            if ((int)var_string.charAt(index)>=65 && (int)var_string.charAt(index)<=90) {
                big_letters_counter = big_letters_counter+1;
            }
            if ((int)var_string.charAt(index)>=97 && (int)var_string.charAt(index)<=122) {
                small_letters_counter = small_letters_counter+1;
            }
        }
        big_letters_per = big_letters_counter*100/var_string.length();
        small_letters_per = small_letters_counter*100/var_string.length();
        System.out.println("The big letters percentage is "+big_letters_per+" %");
        System.out.println("The small letters percentage is "+small_letters_per+" %");
        System.out.println("The spaces percentage is "+(100-(small_letters_per+big_letters_per))+" %");
    }
}


and the output will be as bellow 


Example2
 
Q:
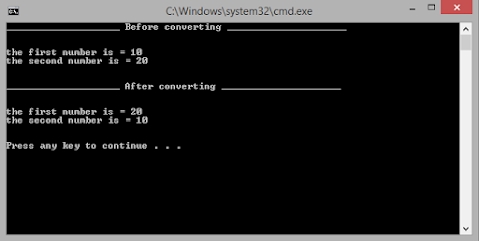
 If A and B are two arrays with a certain number of integers, write a Java program to alternate the elements of the two arrays symmetrically without using other variables or matrices.
 
so the code will be just as 
 
public class test{
    public static void main(String[]args){
        int [] A = {1,2,3,4,5};
        int [] B = {6,7,8,9,10};

        System.out.println("the items of array A before change are ");
        for (int index=0; index<5; index++) {
            System.out.print(A[index]+" , ");
        }
        System.out.println();
        System.out.println();

        System.out.println("the items of array B before change are ");
        for (int index=0; index<5; index++) {
            System.out.print(B[index]+" , ");
        }
        System.out.println();
        System.out.println();

        for (int index=0; index<5; index++) {
            A[index] = A[index]+B[index];
            B[index] = A[index]-B[index];
            A[index] = A[index]-B[index];
        }

        System.out.println("_________________________________________________");

        System.out.println("the items of array A after change are ");
        for (int index=0; index<5; index++) {
            System.out.print(A[index]+" , ");
        }
        System.out.println();

        System.out.println("the items of array B after change are ");
        for (int index=0; index<5; index++) {
            System.out.print(B[index]+" , ");
        }
        System.out.println();
    }
}

 
and the output will be as 


 Example 3
 

Q: 
 
 write a Java program to define the class "person".Contains the variable name_id, year of birth, and year, Then define the "student" class to inherit the elements of the first class, and add  the variables "std_id", "dept", and the "prinrSTD" function to print the complete student data Then define the "test" class that contains the main function, and then execute the program with complete data for the student
 
So the code will be just as

public class test{
    public static void main(String[]args){
        student std = new student();
        std.prinrSTD("Omer",1999,216001,"Mobile Computing");
    }
}

public class student extends person{
    int std_id;
    String dept;
    public static void prinrSTD(String p_name,int year,int std_id,String dept){
        System.out.println("name : "+p_name);
        System.out.println("Birth Year : "+year);
        System.out.println("Student ID : "+std_id);
        System.out.println("Department : "+dept);
    }
}

public class person{
    String p_name;
    int year;
}


and the output will be as


*Note : you have to create each class in a different file in the third example

Monday, September 14, 2020

postgres database backup

postgres database backup

We can make backup for postgres database backup by many ways 

  • from the browser by opening the database manager , and click to backup the database that we want to make a backup for as in the image bellow


  • pgadmin

connecting to the database server as bellow 


then go to the database that you want to make backup for , and right click and then select backup from the menu as in the image bellow 


then you have to define the name for the backup file and the folder which will contain it, and the other information as in the image bellow and then click on the backup button


  • Also we can make database backup from the terminal by writing these commands 
      su - postgres /// to login as postgres user 
      pg_dump dbname > dbname.bak /// to make backup to your database with the name "dbnam" , 
      so don't forget to right the right name of your database 
      psql -f infile postgres ///  to make resulting dump can be restored with psql 
 
#hope this is useful :) 

Odoo Invoice Qr code issues

There are two main issues must of us facing with the QR code in Odoo invoice & these issues are 1/ QR code displayed as broken image w...